Your products vary by price, margins, inventory, seasonality, etc.
While these attributes might seem trivial on paper, they can help you create smarter Google Shopping campaigns (or hurt your campaigns if ignored).
Custom labels allow you to organize products in Google Shopping campaigns to your preference, and the labels will only show up internally. Examples of common custom labels include “seasonal,” “best sellers,” “high ROI,” and so on.
You can (and should) use these specific values to monitor, report, and bid within your campaigns.

Custom Labels: The Basics
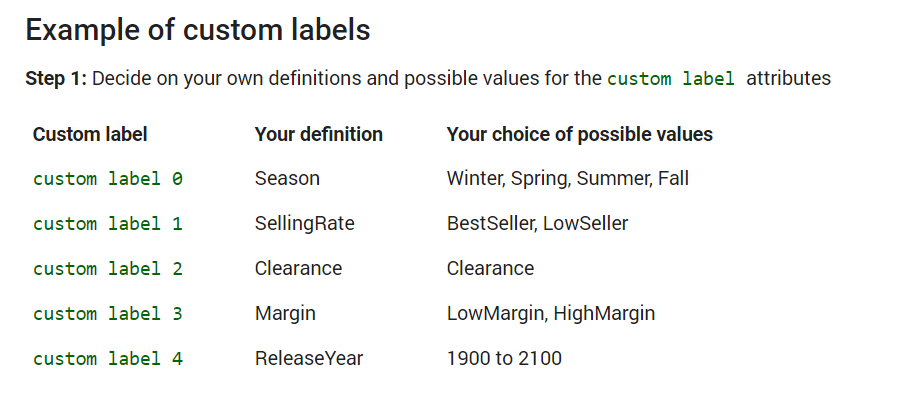
You can have up to five custom labels in your product data feed. These start with 0 and end with 4.
Be sure to assign a specific definition for each of the five custom labels and specify the possible values for each. Use these custom labels consistently across all products in your Merchant Center account, assigning the appropriate value to each product according to the custom label definition.
Each of the five custom labels can only have one value per product.
The values for custom fields will vary based on your products and your business’ unique needs. In the following section, we'll go into detail about how you can "strategize" using custom labels. For now, just note that there are common examples that can easily be adopted by most (if not all) sellers:
- Seasonal - i.e., Winter, Spring, Summer, Fall
- Price Point - i.e.,Under10, Under50, Under100, Over100
- Profit Based - i.e., LowMargin, HighMargin
- Promotional - i.e., Clearance, OnSale
- Performance - i.e., BestSeller, LowSeller

Custom Labels for Campaign Targeting
How you apply custom labels will largely depend on your unique seller profile, i.e., the types of products you sell, your prices, your high and low seasons, etc. To give you an idea of how you can use custom labels to fit your needs, let's look at some common custom label applications.
Seasonality
Do you sell holiday items? Back to school gear? Swimming attire? Kites? Seasonality is a way to modify your bidding strategy throughout the year to reflect when season-specific items are actually selling without going through the trouble of adding and removing them.
By segmenting your products into season-specific groups, you can raise bids when items are in season and decrease them (often significantly) at those times when they are less likely to be selling. The benefits of doing this is that you can still get the odd off-season sale while keeping your ROI where you want it.

Price Point
Let’s say you’ve got some products as low as $10 and as high as $10,000. In order to get the best ROI, your max CPC for the less expensive products should be significantly lower than the max CPC for higher priced items. Unfortunately, Google still doesn’t allow you to segment your products by price, so you have to do this manually using custom labels.
The basic idea is that you group your products based on price and select a max CPC for each group. For example, an ad group that is $30-$99 might have a CPC of $1, while your highest-priced group – say $5,000 & up – has a max CPC of $10.

Profit Based
Also known as bidding by margins, instead of grouping products by sale price, you segment them by the profit you make. It’s different from price point bidding because two items that are selling for the same amount of money may have very different profit margins.
An example of this is a $250 auto part that sells for $500 vs. a $400 lawnmower that sells for $500. Yes, both sell for the same amount, but you are earning significantly more from the sale of the auto part. To properly bid in this way, you need to know the profit margin of each of your products so you can segment them into groups labeled by those amounts and put more of your ad spend toward products netting you a better ROI.
Promotional
There are two ways to go when labeling promotional products with a “Clearance” or “OnSale” tag. If your goal is to get rid of low-selling items as fast as possible – to make room for new merchandise – you can raise your max CPC to increase the chance of potential customers seeing them.
Alternatively, since your profit margins on clearance items are bound to be lower than your margins for other products, you could lower your bids to maintain a strong ROI.

Performance
Generally speaking, it’s a smart strategy for businesses to focus on promoting items that are selling well, while decreasing their marketing budget for products that sit on shelves (real or otherwise) for longer.
Segment your products into groups based on how well they’re selling and you can increase or decrease your bids accordingly to get the best possible return on investment.
Adding Custom Labels: Step by Step
Once you’ve decided what custom labels you want to use, here’s what the process of adding them to your campaigns:
1. Define Your Custom Labels
First, decide on your Custom Label definitions, and the possible values for these attributes. Have a database where you state what your custom labels are and what they represent. It could be a simple Excel spreadsheet. The point is to document what each custom label means.
Here are a few examples:
- Clearance = Discounted products
- LowPrice = Products priced under $10
- HighPerformer = Products whose conversion rates are 3% or higher
2. Assign Values
Next, assign appropriate values to each of your products. As noted above, you can name your custom labels anything, but what you call them should be standardized to some degree.
For example:
- Camel case (HighMargin) or underscores (High_Margin)?
- Abbreviated terms (U500, O1000) or full text (Over500, Over1000)?
As you can see, what you choose is not as important as sticking to it and .
3. Add Custom Labels to Product Feed
Add the custom labels to your product feed. The easiest way to do this is to use a data feed management tool (yes, like GoDataFeed) that lets you assign custom labels to products using automated rules.
Alternatively, you could also add the extra fields on your ecommerce platform manually. Most ecommerce platforms allow you to create extra fields for your products… but this means you’ll have to spend a lot of time keying in extra product information.
You can also create feed rules in Google Merchant Center to assign custom labels using an GMC workflow. Here’s how you do this:
- Click on “Products” in your navigation panel, and “Feeds”. Then click on “Add target attribute” at the bottom of the page.
- Next, choose the “Create a value based on criteria in a feed field” option, and go ahead and create your rule(s).
4. Use Custom Labels to Organize Campaigns
Once your product feeds are updated, the final piece of the puzzle is to reorganize your Google Shopping campaigns. With your new Custom Labels in mind, determine your bidding strategy, and adjust your budget accordingly.
Final Notes
Knowing how your products vary based on these attributes will allow you to use custom labels to segment and organize your product catalog before pushing it to Google Shopping. You can then use those custom labels to create optimized campaigns with bidding strategies tailored to each segment’s unique CPA.


%20).webp)